Landscape Photography Gibberish
When I started out in landscape photography I did not have a clue what I was doing. I mashed the shutter button on my camera in the expectation that, surely, the result would look exactly the way I remembered the scene. Then there were all those smug veteran photographers with their amazing images that all looked so effortless. I always wondered how much of these unique looks were achieved straight out of camera, and how much of it was done at the computer. Since no one shared their processes or RAW images in any great detail, I just decided that my photography sucked.
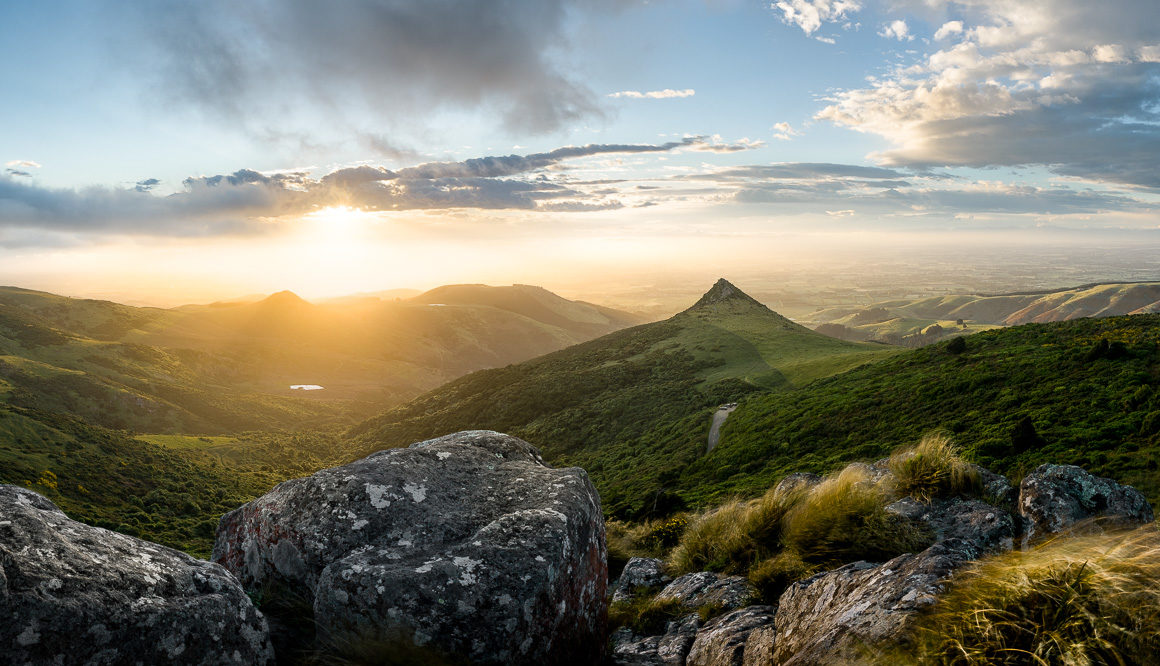
If you are grinning to yourself, you know exactly what I’m talking about. In the point-and-shoot phase you think that your images are the best thing since sliced bread. Once you start comparing yourself to others, you realise that there’s probably a little more to it. Getting an image right is a sometimes painfully complex process. Often you only need to get one ingredient in your recipe wrong to muck up the whole cake. While I will talk a little more about my shooting and editing process, there are quite a few things outside anything technology-related that go into an image like the one above (bigger version here).
For one I had to know this place existed. Fellow photographers and random internet searches are a good starting point to find inspiration. Then I had to return several times to scout out good locations with different shooting options. I like maximising my chances to take a nice image, so I had a list of different near-by locations I wanted to shoot. Then it’s a matter of waiting for the right day and religiously watching the weather forecast. Very often you will find yourself at the whim of the heavens, going home empty-handed. I get quite grumpy when that happens.
My location happened to be up on the edge of Christchurch’s Crater Rim. The place is at the top of a rocky outcrop, and about as exposed as it gets. Getting up there was a scramble across gusty, exposed terrain. If you find yourself confronted with a short climb, make sure to keep in mind that going down is always harder than going up.

Full house on Coopers Knob
Then, when I finally found a good spot on the narrow tops, cloud started moving in. I had only a few minutes before visibility was down to zero. We pretty much went from 20 degrees in the sun to howling southerly gales in the dark. The punchline is to always, always bring a torch and warm clothes.
With less than five minutes to get the shot, it was good I had come with a plan. I wanted to include some foreground rocks and tussocks to anchor a sweeping view of the landscape. I knew I wanted to capture the full width of the landscape, so I decided to shoot a panorama. Shooting a super-wide angle lens would have been an option as well, but I would have ended up with a lot of empty sky and possibly my own feet in the image. The interesting part of the image would have been a narrow strip in the middle. If I had cropped that image, there would not have been much resolution for large prints left. Shooting a panorama of several portrait-format images helped me to emphasize the horizontal aspect of the scene, while taking home a lot of delicious megapixels.

Panorama photography provides extra resolution, in this case 52 megapixel (100% view)
My next challenge lay in shooting directly into the sun. I knew my camera sensor would not be able to capture the massive dynamic range present in the scene. I could have used my Nisi filters, but I had a feeling that an aggressive editing approach was the safer strategy in high winds (didn’t want to drop that expensive glass). So I ended up shooting a bracket: a series of images at different exposures. This allowed me to capture the full tonal range from the deepest, blackest shadows to the fiery orange ball straight ahead of me.

15 RAW files in Lightroom
Back at home I ended up with a grand total of 15 images that went into the final shot. Five images came together in one panorama, with five additional images each for a brigher and a darker panorama. While the panorama feature in Lightroom and Photoshop works well, pixel-perfect overlap of all three panoramas was essential to merge the images later. Photoshop and Lightroom would have had slight variations in the three panoramas, so I decided to stitch the base exposure in PTGUI and create a template. I applied this template to the other two panoramas so they would be merged identically.

My base exposure in PTGUI
The next step required me to blend these images. There are a lot of different approaches with fancy names, but the idea is the same: To keep the good bits of several images and merge them into one shot. In this case I used the brighter exposure for the dark foreground, the base exposure for background and sky, and the dark exposure to gain a little more detail around the sun. I use a tool called Lumenzia to mask out my images by brightness (aka luminosity masking). This approach isn’t only faster than anything else I have worked with, it also gives super-smooth gradients without any visible edges. Unlike a lot of automatic HDR tools, I can still make manual changes to parts I don’t like.

Luminosity masking with Lumenzia
Once my three panoramas were merged into one image, I had a pretty washed out looking image that I could start working on in Lightroom. It didn’t not look like much yet, but starting like this has many advantages. All areas of the image show great detail, and thanks to blending in the bright exposure, even the dark bits show little noise.

The mask on the right shows which parts will be kept
Lightroom is where I create the look and mood of the image. In this case it received some global adjustments (colours, constrast and so forth), and also a few local ones. I used gradients, and brush adjustments to further direct the viewer into the image. Generally speaking the eye is drawn to areas of high brightness, high contrast or intense saturation. In this case I darkened the top of the sky and the bottom around the rocks to guide the viewer towards the middle of the frame.

A gradient in Lightroom darkens the bottom right corner of the frame
People sometimes ask me why I don’t do all the work in Photoshop. Using Lightroom to create the look of an image is simply a personal preference. I like the simpler, less distracting workflow. Photoshop is where I do my surgery. It’s the place where the heavy engineering happens. Lightroom on the other hand is my salon. It’s where I make things look pretty.
This animation should give you a pretty good overview of the editing magic that went into this image:

I hope this overview of my shooting and editing process helps to shed some light on how much work a nice landscape image can be. Sometimes you get lucky and what comes out of your camera is almost perfect. Other times it’s an exercise in overcoming different limitations posed by gear or your scene.
Considering location, subject, timing, composition, creativity, technique and editing will become second nature eventually. With a bit of practice you will be able to look at an amazing picture and think to yourself ‘I know how that was done’. The internet is full of good tutorials, so don’t hesitate to look up the bits you are interested in.
If you prefer to learn things in a more organised fashion, have a look at my workshops. The Hero Holiday covers everything I just talked about in a four-day hands-on learning experience in cool locations around New Zealand.